Build an App on iPad with Swift Playgrounds and Core Data
Happy Swift Playgrounds day! If you haven’t heard, you can now write apps on your iPad.
It’s very full featured, but one thing that you might need to do a little extra work on is persistence. Can you use CoreData, for instance? The answer, is, mostly, yes.
For instance, we can get the basics of a CoreData ToDo list running quickly. You can see me cross off and uncross off tasks in the preview below and to the right.
A video of a ToDo app made with CoreData and SwiftUI on Playgrounds.
To the code!
First off, so much of this is thanks to the work made in this blog post on creating CoreData models without the special, graphical model constructor. So if you have more questions about creating relationships between multiple entities, that’s a good place to go.
For our use, we’ll just use on object, a Task (and I should probably rename that considering all the new async feature naming with TaskGroup and such).
Here are all the files I have:
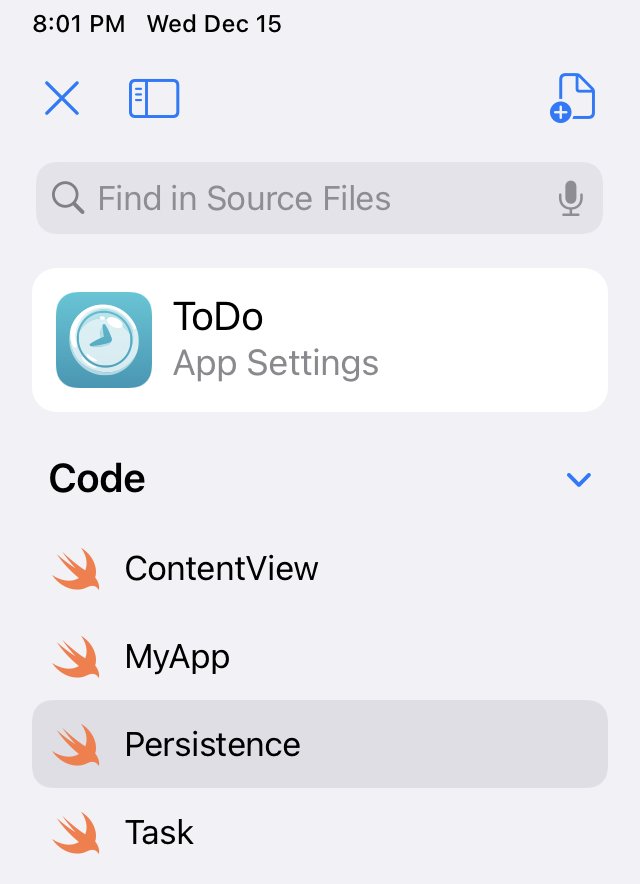
Here is the first file. My model of Task
`import CoreData
import SwiftUI

@objc(Task)
class Task: NSManagedObject {
    @NSManaged var complete: Bool
    @NSManaged var name: String?
    @NSManaged var index: Int
}

extension Task: Identifiable {
    var id: Int {
        index
    }
}`
And now that I have that, I can create my Persistence layer like so:
`import CoreData
import SwiftUI

class Persistence {
    static let shared = Persistence()

    static let previewFull: Persistence = {
        let result = Persistence(inMemory: true)
        let context = result.container.viewContext
        for index in 0 ..< 5 {
            let task = Task(context: context)
            task.name = "Task \(index + 1)"
            task.complete = false
            task.index = index

            context.perform {
                try! context.save()
            }
        }
        return result
    }()

    let container: NSPersistentContainer

    init(inMemory: Bool = false) {
        let taskEntity = NSEntityDescription()
        taskEntity.name = "Task"
        taskEntity.managedObjectClassName = "Task"

        let nameAttribute = NSAttributeDescription()
        nameAttribute.name = "name"
        nameAttribute.type = .string
        taskEntity.properties.append(nameAttribute)

        let completeAttribute = NSAttributeDescription()
        completeAttribute.name = "complete"
        completeAttribute.type = .boolean
        taskEntity.properties.append(completeAttribute)

        let indexAttribute = NSAttributeDescription()
        indexAttribute.name = "index"
        indexAttribute.type = .integer64
        taskEntity.properties.append(indexAttribute)

        let model = NSManagedObjectModel()
        model.entities = [taskEntity]

        let container = NSPersistentContainer(name: "TaskModel", managedObjectModel: model)

        if inMemory {
            container.persistentStoreDescriptions.first!.url = URL(fileURLWithPath: "/dev/null")
        }

        container.loadPersistentStores { description, error in
            if let error = error {
                fatalError("failed with: \(error.localizedDescription)")
            }
        }

        container.viewContext.mergePolicy = NSMergeByPropertyObjectTrumpMergePolicy

        container.viewContext.automaticallyMergesChangesFromParent = true
        self.container = container
    }
}`
You’ll notice that we just needed to specify a bunch of attributes manually for our object, instead of using the graphical interface we have available in Xcode.
And I’ve created a preview version of Persistence to have some starter dummy data.
Then we can create our app like this:
`import SwiftUI

@main
struct MyApp: App {
    let persistence = Persistence.previewFull
    var body: some Scene {
        WindowGroup {
            ContentView()
                .environment(\.managedObjectContext, persistence.container.viewContext)
        }
    }
}`
And our view is this:
`import SwiftUI

struct ContentView: View {
    @Environment(\.managedObjectContext) private var viewContext

    @FetchRequest(sortDescriptors: [
        NSSortDescriptor(keyPath: \Task.index, ascending: true)
    ], animation: .default)
    private var items: FetchedResults<Task>

    var body: some View {
        List(items) { item in
            VStack {
                if !item.complete {
                    Text(item.name ?? "Unknown")
                } else {
                    Text(item.name ?? "Unknown")
                        .strikethrough()
                    }
            }
            .onTapGesture {
                    viewContext.perform {
                        item.complete.toggle()
                        try! viewContext.save()
                    }
                }
        }
    }
}`
From there you can move forward with CoreData in SwiftUI as you would elsewhere, and we’re off and running!
Quick Limitation
I like to use all of the automagicalness of CloudKit when I’m working with CoreData, and at least with iPad alone, there isn’t a way to do all of that, so you’ll need to code up your own syncing solution as well if you want that. Both CloudKit entitlements and push notifications [Correction: it seems that local notifications are working, so remote push notifications may well be working too!] are absent from the capabilities you can give your app.
Let me know if you find ways around that, and checkout my app Pearl: Wellness Reminders, which does in fact contain that CloudKit/CoreData syncing goodness, just not via the iPad yet!